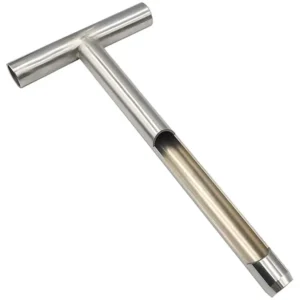
Soil Sampler
A soil sampler tool is super useful for anyone who loves gardening, farming, or studying the environment. It’s a special gadget that helps you grab a bit of soil without making a big mess. This tool helps you grab a bit of soil from the ground easily so you can check out what’s in it. Knowing about the soil, like how many nutrients it has, how wet it is, and what kind of stuff is mixed in, helps you figure out how to take care of your plants better.
This means you can be sure not to waste water or fertilizer by only using what your garden really needs. This is not only good for your plants but also helps the planet by saving resources and not adding too much stuff to the soil.
Showing the single result
How to do Soil Sampling!
Soil Sampling helps you figure out what's happening below the surface so you can keep your plants happy and healthy. Here's how to do it step by step, and don't worry, it's easier than it sounds!- Pick Your Spots: First, Grab a soil sampler tool and decide where you want to take your samples from. If you have a big garden or farm, you might want to take several samples from different places to get a good overview.
- Dig In: Now, push your soil sampler into the ground. It's like putting a straw into a milkshake. You might need to twist it a bit to get it deep down. You're aiming to get a slice of soil from the surface down to about 6 inches deep.
- Pull It Out: Gently pull the sampler out of the ground, and you'll have your soil sample inside. It's a little column of dirt that tells a big story about what's going on under there.
- Label Your Samples: If you're taking lots of samples, make sure to label them so you remember where they came from. This can help you remember which parts of your garden need different kinds of care.
- Send It Off or Test It Yourself: You can send your soil samples to a lab to get them tested, or you can use a home test kit to find out things like how acidic your soil is or if it's missing any important nutrients.


 Mosquito Traps